
Showing posts with label clay. Show all posts
Showing posts with label clay. Show all posts
Monday, February 25, 2013
3rd grade clay and wire sculptures

Clay landmasses and more from grade 2


We experimented coloring the white clay with markers. The salt clay dries in about a week.

Friday, February 1, 2013
1st grade Life cycle of the Butterfly


This project let the students do several different techniques to create their life cycle pictures.
We stamped butterfies onto paper for them to color and cut out. They then pasted it onto the plate. We also outlined a leaf for them which they colored and cut out and pasted onto the plate. They then used a green chenille stem to create the Catapillar and put him on the plate and lastly used clay and a stick to create the chrysalis and glued it to the plate. They labeled it all and we pretty proud of their project. This class is always ready to try things so it has been fun to do complicated projects with them.
Wednesday, June 20, 2012
Art mini-camp photo slideshows
Art Mini- camp slideshow Summer is in full swing and camp has kids busy painting and using clay and other art mediums. Thought that it would be simpler to share the weblink as we post each day's pictures over the 8 weeks of camp in June and July.
%20no-repeat%20left%22%3E%3Ca%20href=%22https://picasaweb.google.com/dianne.koehler51/ArtCamp2012?authuser=0&feat=embedwebsite%22%3E%3Cimg+src%3D%22https://lh3.googleusercontent.com/-rtxN4H0MpfE/T9uySSc7CXE/AAAAAAAAHps/lnAN62GJnrc/s160-c/ArtCamp2012.jpg?gl%3DUS%22+width%3D%22160%22+height%3D%22160%22+style%3D%22margin:1px+0+0+4px;%22%3E%3C/a%3E%3C/td%3E%3C/tr%3E%3Ctr%3E%3Ctd+style%3D%22text-align:center;font-family:arial,sans-serif;font-size:11px%22%3E%3Ca+href%3D%22https://picasaweb.google.com/dianne.koehler51/ArtCamp2012?authuser%3D0&feat=embedwebsite%22+style%3D%22color:#4D4D4D;font-weight:bold;text-decoration:none;">art camp 2012</a></td></tr></table>)
Friday, June 8, 2012

 I am excited to be offering a 3 day mini-art camp as part of the summer program at the school this year. We will be taking students from age 5-13 in a series of camps that let the students have a real hands on experience with art materials and science from a slightly different perspective. It also gives me the chance to help raise funds for the school science lab. See the list at the side bar for details.

Painting and clay projects


Monday, January 16, 2012
more clay creations
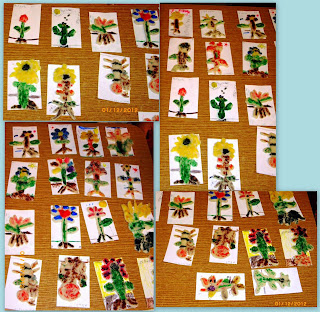 We are spending the month of January working with clay. Sometimes this medium really lends itself to integrating into the lessons as with the plant parts for the kindergarten. Each student got a 3x5" note card as a base and a ball of salt clay. We discussed plant parts and drew a plant on the board then they were off. Each was to include all the parts on their plant remembering to include roots and seeds. They are pretty good at the proportions on these. When the plants were completed we used washable markers to color them with pretty great results.


Monday, April 18, 2011
Sculpting clay dragons is a bit harder than we thought!
 Everyone in the class has been begging to try sculpting and was not too excited about doing a simple basket so we tried our hand at dragons. It took 3 weeks of classes to create them but we had to work for it. Next week we paint them. We had quite a few things to learn about the clay process so it was a really great project to do. We had to find the "exactly right" amount of moisture to use to form the shapes and attach one to another. We had to figure out how thick or thin the parts could be and still hold their form. We used toothpicks as supports to keep heads balanced while drying. It was a bit hard to get past the ugly stage for most of the little ones but when we add paint they will really come to life.
Friday, February 18, 2011
Dinosaur prints and fossils
 Another great clay project. I made the dinosaur feet in advance using femo clay and baked them then brought the rest of the items in the fossil box for the 1st grade class to use. We got to talk about dinosaurs and that they all seemed to have 3 toes, how fossils were made and what might be in fossils along with dinosaur tracks.
Saturday, October 30, 2010
3rd grade completes ecosystems

 This is a creative project that uses recycled materials as the base to create an example of types of ecosystems. The 2 water based systems -fresh water on the left and salt water on the right have covers painted in blue with fish swimming on strings. the fresh water one has a cave and water plants on a sandy base while the salt water one sports reefs and a variety of shells on its sandy base.
 The three land based systems were desert, forest and grasslands. Everyone wanted to use all the materials but were able to limit themselves to only the items required. A lot of sand and clay went into some of the ecosystems. all the groups drew their own animals and plants then placed them into the plastic boxes. Sometimes the animals or plants were a bit out of proportion to each other but almost all were easily identified. It was a great group project and a good way to have them work with a variety of material. The groups had to submit supply lists the 1st week based on what system they were creating.
Sunday, May 16, 2010
1st graders create clay insects
 Completing study of insects, the students made these examples complete with all the proper parts.
Making volcanos
 we started the class with the erupting volcano in the playground then came into the classroom to create one to take home. Using the wider mouthed bottle was great but the narrow mouthed bottle was so much more popular shooting the solution high into the air.
We used 8oz water bottles, quart yougurt containers and homemade clay with paper. At first it was a little hard to get the clay and paper to stick but then we hit on the method and the results were well worth it.
For the eruption:
half a bottle warm water
2Tbs baking soda
6-8 drops dishwashing soap
few drops food color (optional)
then add:
1/2 cup vinegar and jump back
Wednesday, May 12, 2010
3rd grade creates clay ecosystems/finger puppets


For president's day we created a pair of finger puppets to have a conversation. Lots of Obamas and other presidents from the flash card set.
Thursday, November 12, 2009
1st Grade makes clay and pinecone turkeys
 It was not very messy and everyone was able to do these turkeys with just a little help. We used pinecones that had opened just a little but still had pointy ends for the head. First we made the feathery tails from a paper plate and drew our own feathers and colored them. Using the homemade clay in brown, yellow and red we created the head, comb, beak and goblers and pressed them on. We glued the tail to the body, some needed a bit of a splint or cushion between the tail and cone to seat them. Of course most of the students have not seen live turkeys but these are a pretty good representation anyway.
Subscribe to:
Posts (Atom)